Leave Management
This page shows you how to set up and manage your employees' leave.
Before you start
You need to understand the difference between leave types and entitlement policies:
- Leave types are the categories of leave your company offers, such as annual, sick, or family responsibility leave.
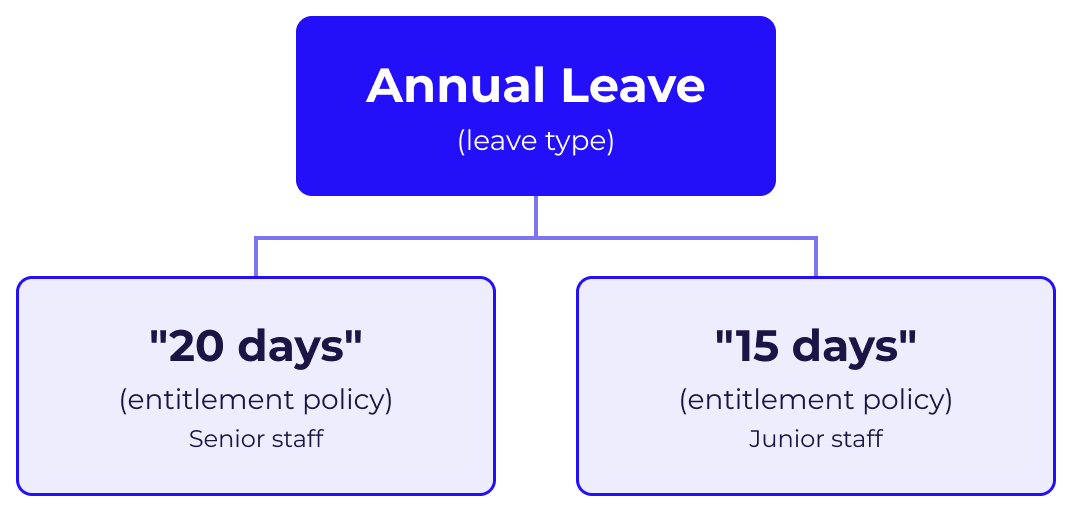
- Entitlement policies are the rules that govern how each leave type works for different groups of employees. They set how many days employees get and whether those days are accrued or given upfront. One leave type can have more than one policy; in other words, you don't need a separate leave type for each group. For example, an annual leave type can have one policy that gives senior staff 20 days and another that gives junior staff 15 days (see the example below).
Example – One leave type with two entitlement policies
👉 How-To Guides
How to set up your leave
Step 1: Review your existing leave setup
Before making any changes, check which leave types and entitlement policies are already set up.
System policies
Each system leave type has a system policy that follows the minimum entitlements in the Basic Conditions of Employment Act (BCEA). Most customers use the system policies without any changes.
On the leave type screen, the system policy appears as "System Policy" under Available Entitlement Policies. Its rules aren't shown there and can't be edited. To see how each system policy calculates leave, see the Leave Types and Entitlements help page.
Step 2: Decide what changes you need
| If you need to… | Go to… |
|---|---|
| Use the standard BCEA leave for everyone | Regular Hours, to confirm that each employee's hours are set up correctly. No policy changes are needed, unless your sector or bargaining council requires more leave. |
| Change an existing leave type (more days, accrual, carry-forward, or expiry) | Step 3, then Step 5 |
| Add a leave type that doesn't exist yet (e.g. study leave) | Step 4, then Step 5 if only some employees get it |
| Move leave balances from another payroll system | Step 6 |
Most common customisations (see Step 3):
- Leave expiry rules (a six-month expiry after the leave cycle ends)
- Different annual leave amounts (for example, 20 days instead of 15)
Step 3: Create a custom entitlement policy
Create policies with different rules under existing leave types.
Custom policies and BCEA minimums
The system policy works out each employee's entitlement from the number of days they work per week, as set up in their Regular Hours. A custom policy gives everyone on it the same fixed number of days. Before you assign a custom policy, confirm that it gives each employee at least the BCEA minimum for their working week. For sick leave, we recommend keeping the system policy. A custom policy can't apply the BCEA rule for an employee's first six months (one day of sick leave for every 26 days worked).
- Go to Settings > Leave.
- Click View next to the relevant leave type.
- Under Available Entitlement Policies, click Create Entitlement Policy.
- Complete the fields. See Custom entitlement policy settings for what each field does.
- Click Save.
- Go to Step 5 to add the policy to the relevant employee(s).
Step 4: Add a new leave type
Use this step for completely new leave types not covered by our system policies.
First entitlement policy applies to all employees
When you add a new leave type, the first entitlement policy you create becomes the company default; in other words, it applies to all current and future employees. If only some employees get this leave, enter "0" in the Default entitlement field. Then create a second policy with the correct number of days (see Step 3), and assign it to those employees (see Step 5, Option B).
- Go to Settings > Leave.
- Click Add Leave Type.
- Under Basic Details, complete the fields. SimplePay adds "Leave" to the name on some screens, for example, "Study" becomes "Study Leave" on the leave type screen. See Leave type settings for what each field does.
- Click Next.
- Under First Entitlement Policy, complete the fields. See Custom entitlement policy settings for what each field does.
- Click Save.
Step 5: Assign an entitlement policy to employee(s)
Option A: Change the company default
The company default applies to all current and future employees, except those who have their own policy (Option B or C).
- Go to Settings > Leave.
- Click View next to the relevant leave type.
- Under Active Entitlement Policies (company defaults), do one of the following:
- To change the policy for all dates: Click Edit next to the existing range, select the policy from the Entitlement Policy drop-down, and click Update.
- To change the policy from a specific date: Click Add Entitlement Policy Range, enter the Effective From date, select the policy from the drop-down, and click Create.
Option B: Assign individual policies
Use this option to give a single employee a different policy from the company default. For more information, see the Employee-Specific Leave Management help page.
- Go to Employees, and select the relevant employee.
- Go to Leave > Entitlement Policies.
- Click Edit next to the relevant leave type.
- Click Add Entitlement Policy Range.
- If applicable, select the appropriate Effective From and Effective Until dates. If the employee already has an undated policy, click Edit next to it instead.
- In the Entitlement Policy drop-down list, select the relevant entitlement policy.
- Click Create.
Option C: Assign policies in bulk
- Go to Employees > Bulk Actions.
- Under Leave, click Entitlement Policies.
- Use the filters to select the pay frequency or pay point.
- For each employee, select the relevant policy for each leave type from the drop-downs.
- Click Save.
Employees with effective dates
Bulk assignment can't set effective dates. If an employee's policy for a leave type has an Effective From or Effective Until date, Date-based appears instead of a drop-down, and you can't change it in bulk. Click Date-based to edit the policy individually (see Option B).
Step 6: Capture leave take-ons (if switching from another system)
See the Leave Take-On Balances help page for the individual and bulk steps.
The take-on balances you enter are the employee's balances on the End of take-on period date. SimplePay calculates leave from the day after this date, so include all leave earned and taken up to and including it.
Step 7: Check your setup
Once you've finalised payslips, go to Reports > Leave Report to confirm that your setup is working as expected. For more information, see the Leave Report and Leave Days Report help page.
Managing leave after setup
After setup, you can record leave, delete it, or make leave adjustments.
Record maternity and parental leave as a long-term absence, not on the leave calendar.
📌 Quick References
Custom entitlement policy settings
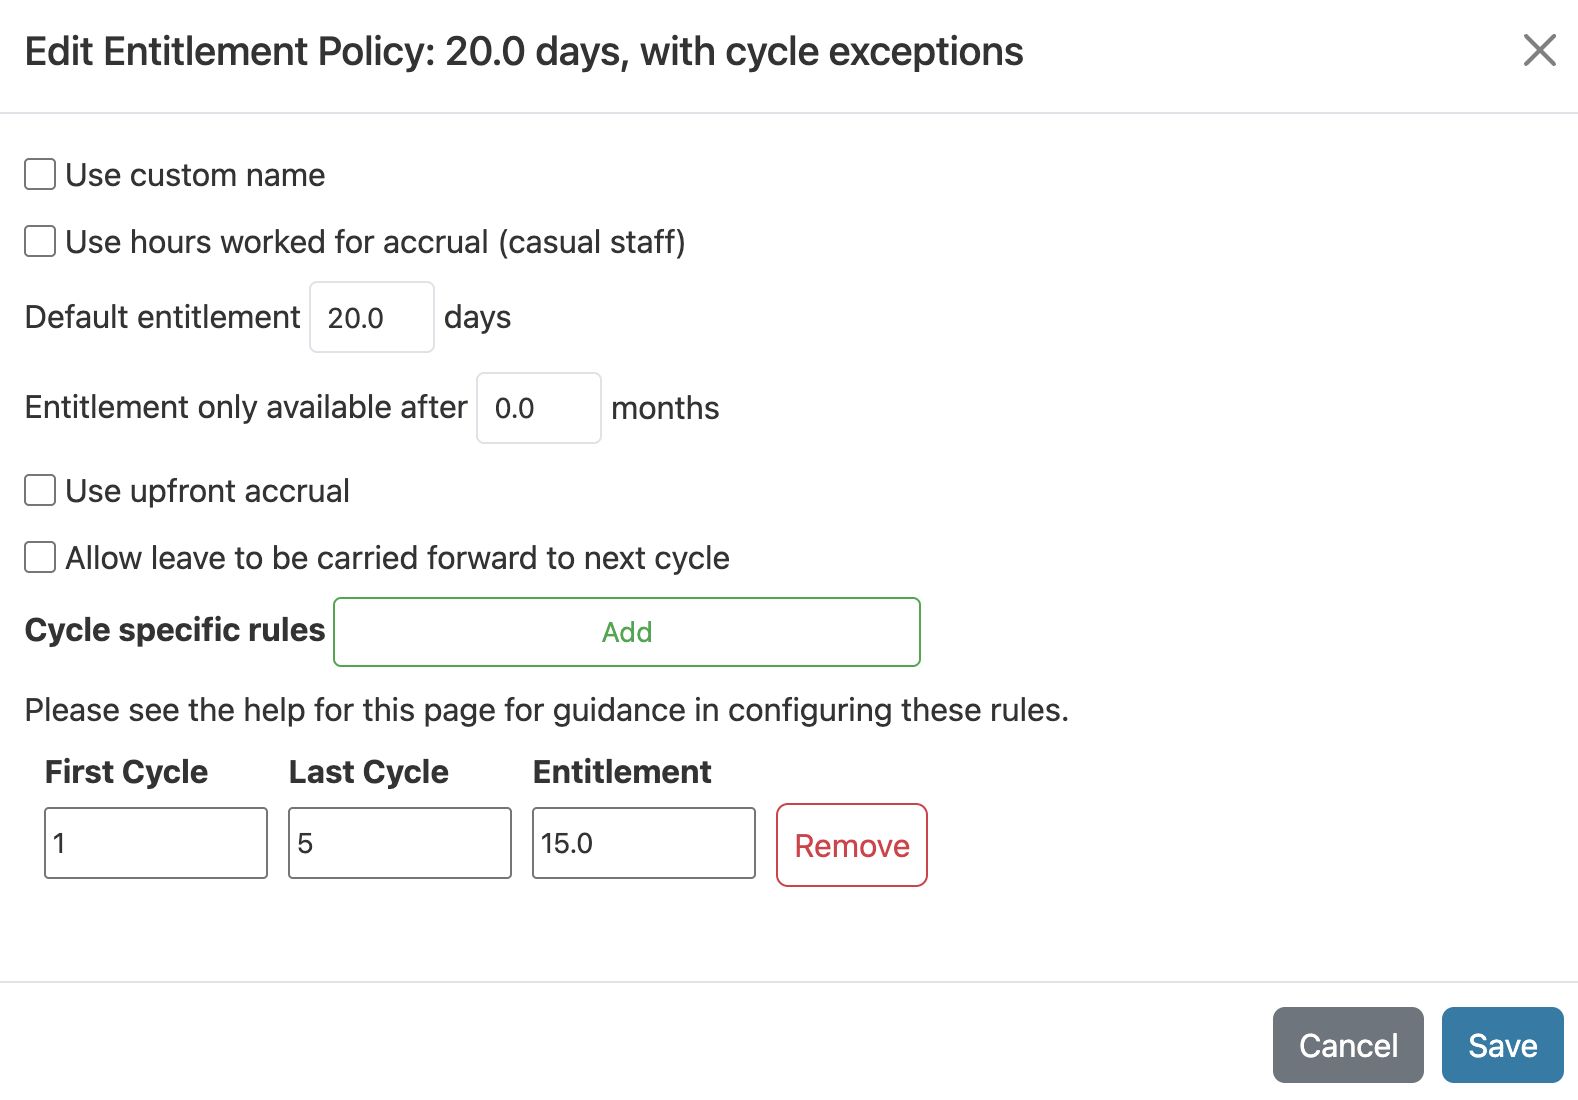
Example – Cycle specific rules
- Default entitlement: 20 days
- Rule: Cycles 1 – 5 at 15 days
- Result: 15 days for cycles 1 – 5, then 20 days from cycle 6 onwards
Leave type settings
Go to Settings > Leave > View (next to the relevant leave type) > Edit Details. When you add a new leave type, these fields appear under Basic Details.
| Setting | Options | Description |
|---|---|---|
| Name | Text | Sets the name of the leave type, e.g. "Study". |
| Cycle length | • Default: 12 months • Choose custom months |
Defines the period for leave calculations. |
| Cycle start date | • Appointment Date • 01 January • Custom |
Sets when the leave cycle begins for calculations. |
| Custom date | Day and month | Sets the date each leave cycle starts, for all employees. Available only when "Custom" is selected under Cycle start date. |
| Visible for | • Everyone • Employees with a recent, current, or future entitlement |
Controls which employees see this leave type, e.g. on their leave calendar, in Self-Service, on payslips, and in leave reminders. |
| Unpaid leave | Checkbox | Determines whether this leave type is paid or unpaid by default. Editable only on custom leave types. Can't be changed once leave of this type is on a finalised payslip. |
| Show on payslips | Checkbox | Determines whether the leave balance appears on employee payslips. |
| Show leave expiry to employees (if applicable) | Checkbox | Determines whether leave expiry dates appear on employee payslips. Available only when Show on payslips is ticked. Also needed for leave expiry reminders. |
| Set minimum balance rule | Checkbox | Enables restrictions on how low leave balances can go. |
| Minimum balance | • Default: 0 • Custom: A negative whole number, for example, -1 |
Sets the lowest leave balance allowed before restrictions apply. Available only when Set minimum balance rule is ticked. |
| Allow rule override | • Not Allowed • Admins & Leave Admins • Approvers, Admins & Leave Admins |
Sets who can approve leave requests that would take the balance below the minimum. Required, and available only when Set minimum balance rule is ticked. |
| Hide balances in Self-Service? | Checkbox | Determines whether leave balances are hidden from employees in their Self-Service portal. |
Policy assignment methods
| Method | Best for | How to get there |
|---|---|---|
| Individual | Single employee changes | Employees > select an employee > Leave > Entitlement Policies |
| Company default | Organisation-wide standards | Settings > Leave > select the relevant leave type > Active Entitlement Policies |
| Bulk assignment | Multiple employees | Employees > Bulk Actions > under Leave, click Entitlement Policies |
The difference between leave types and entitlement policies
| Aspect | Leave types | Entitlement policies |
|---|---|---|
| What they are | Categories of leave (annual leave, study leave, etc.). | Rules governing how leave works. |
| How many you need | One per category of leave. | At least one per leave type. Adding more is optional. |
| What they control | Basic settings like leave cycle dates. | Entitlement amounts, accrual methods, carry-over rules. |
| Example | "Annual Leave" | "Senior Staff Annual Leave: 20 days" |
| When to create new ones | Only if additional categories are needed. | When different employee groups need different rules under a leave type. |
Best practice
Create a new leave type only for a category of leave that doesn't exist yet. If you need different rules for an existing leave type, create a custom entitlement policy instead.
BCEA minimum leave entitlements
| Leave type | Minimum entitlement | Leave cycle |
|---|---|---|
| Annual leave | Three weeks of working days (e.g. 15 days for a five-day week, 18 days for a six-day week). | 12 months |
| Sick leave | Six weeks of working days (e.g. 30 days for a five-day week). First six months: one day for every 26 days worked. | 36 months |
| Family responsibility leave | Three days, for employees with more than four months' service who work at least four days a week. | 12 months |
🔍 FAQs
My employees get 15 days of annual leave, but I want it to carry forward for six months before it expires. How do I set up the entitlement policy?
- Follow Step 3 above to create a new entitlement policy.
- Enter "15" in the Default entitlement field.
- Leave the Use upfront accrual box unticked so that leave accrues gradually through the cycle, as with the system policy.
- Tick the Allow leave to be carried forward to next cycle box.
- Enter "6" in the Leave carried forward expires after __ months field.
- Click Save.
- Remember to add this policy to your employees using Step 5.
Employees who don't work five days a week
This policy gives everyone on it 15 days, however many days they work per week. Assign it only to employees who work five days a week, and create separate policies for other working weeks.
Can I set different leave policies for different employee groups?
Yes, you can create multiple entitlement policies and assign them to different employees. For example, senior staff might have different annual leave entitlements from junior staff.
What happens if an employee's leave balance goes below zero?
By default, the system shows a warning when leave takes a balance below zero, but you can still record or approve the leave and save it. To limit how low a balance can go, set a minimum balance for the leave type.
To set a minimum balance:
- Go to Settings > Leave.
- Click View next to the relevant leave type.
- Click Edit Details.
- Tick the Set minimum balance rule box.
- In the Minimum balance field, enter the lowest balance allowed, e.g. "0", or "-2" to allow up to two days of advance leave.
- From the Allow rule override drop-down, select who can approve leave that would take the balance below this minimum:
- Not Allowed: Nobody. Employees can't submit these requests in Self-Service, and admins can't record the leave either.
- Admins & Leave Admins: Only approvers in the employee's approval group who are also Account Owners, Admins, or Leave Admins can approve these requests.
- Approvers, Admins & Leave Admins: Any approver can approve these requests.
- Click Save.
The system compares the minimum balance to the balance the employee will have on the leave date, including any leave they accrue before then, not their current balance.
How do I handle employees who join mid-cycle?
You don't need to do anything differently. The system works out the employee's leave entitlement from their appointment date. Accrued leave builds up from that date. Upfront leave is pro-rated for their first cycle unless the leave type's cycle starts on the appointment date, in which case they get the full entitlement.
Can employees request leave through the system themselves?
Yes, if you enable Self-Service, employees can submit leave requests through their portal. You can set up approval groups to manage these requests before they're processed.
What's the difference between upfront and accrued leave?
Upfront leave gives employees their full entitlement at the start of each leave cycle. Accrued leave builds up gradually as they work through the cycle.
How do I import leave balances from my previous payroll system?
Use the Leave Take-On Balances feature to enter existing leave balances for each employee. This ensures continuity when you switch to SimplePay.
I need to record leave, but the date on the calendar is greyed out. Is there a setting to change this?
- Contact Support, and ask them to enable the Leave on Any Day feature.
- Once the feature is enabled, go to Employees, and select the relevant employee.
- Click Edit Info > Regular Hours.
- Tick the Allow leave on any day box, and enter the date from which the setting applies in the Effective from field.
- Click Save.